日本語の場合は、上隅にある旗をクリックして「日本語」を選択します。
Part two of this Plant growing blog will focus on adding flowers to the stems that we learned how to grow in part 1. There are a few sections, the first focuses on colors, the second deals with how and where the flowers will actually be growing. Then we look at the varieties of flowers available in this project before wrapping up this post with saving and killing the plants.
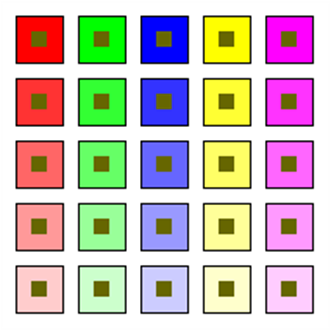
One routine that each flower variety will have in common is the routine deciding color. Each flower routine will call on it at some point so I want to explain that one first before moving onto the flower birthing and sizing process. The user will pick the color from a standard list of 5 colors: red, blue, green, yellow, and purple. However, in keeping with the spirit of making these plants as organic as possible, the color should vary a little within the desired colors range. If a user selects red, all the flowers will be red but some may be lighter shades, not all will be the same shade of true red. To achieve the desired effect, we will once again be manipulating the RGB color values.
Within those five different hues there will be five different shades each. I will explain how this is achieved and of course, this won’t be an exhaustive list of colors, more colors can be programmed in later. It is probably easiest to start with an example. Let’s assume the user selected “Red” from the dropdown menu, true red’s RGB values are (255, 0, 0) so each flower would then be filled in with RGB(255,0,0). If a lighter shade is required we can fill the flowers area with RGB(255,51,51). To ensure that the color stays some shade of red blue and green should be equal and I will have them increase by 51 per shade. True blue is obviously RGB(0,0,255) and a lighter blue could be RGB(204,204,255). The trick is to keep all the color variables equal then increase the desired color up to the maximum intensity of 255. The easiest way to achieve this that I found is to generate a random integer from 0 to 4 (five different number possibilities for five different shades of color). Set each color variable equal to that random number multiplied by 51 then, at the very end, crank up to intensity of the desired color.
Sub colory()
randocolor = Application.WorksheetFunction.RandBetween(0, 4)
red = randocolor * 51
blue = randocolor * 51
green = randocolor * 51
If Range(“BG26”).Value = “Blue” Then blue = 255
If Range(“BG26”).Value = “Red” Then red = 255
If Range(“BG26”).Value = “Green” Then green = 255
If Range(“BG26”).Value = “Purple” Then red = 255: blue = 255
If Range(“BG26”).Value = “Yellow” Then red = 255: green = 255
End Sub
Just to help clarify that code block, say the user selects red and the random number comes back as 3. Red, green, and blue are all set to 153 (3*51). After setting the three variables the program resets red back to 255 resulting in a color for that specific flower of RGB(255,153,153). And of course there will be a new color generated each time a flower needs to be created, in this scenario they will always be red but a random selection of shades of red. Here is a sample of each flower color in the medium flower size:
In addition to the color selections, there are three flower sizes that the user can choose from and they look like this:

They all will obey the same spawning rules so that’s what I would like to focus on first, the code that makes them grow in the first place and the variety can be handled later. The logic behind this is very easy, I do not want any flowers popping up randomly in the sky or anything, they have to be attached to the stems we just learned how to grow in part 1. Also, I don’t want a flower on every single stem segment, that would be way too messy and unrealistic. With both of those criteria in mind, here is the plan: canvas the growing area and if the program hits on a cell containing a stem segment then run a quick test. If the program passes the test, grow a flower, if not then move onto another cell.

The test is a simple one. Generate a random number, called “rando” below, using RND in VBA, this gives a number between 0 and 1. If we want to grow a flower only 8% of the time then say:
rando = Rnd
If rando > 0.92 then
‘Code goes here for growing a flower
End if
And if you haven’t already guessed, I want that percent to be a variable, and since I am making it a variable, I may as well allow the user to alter it. You can see on my spreadsheet that the user can enter this number in cell BG30 under the flower options section. So if the user enters 8 in cell BG30, for an 8% density of flowers, we actually want the program to only create a flower if the random number is greater than or equal to 0.92 ((100 – 8))/100). So the equation to use for obtaining the density variable is this:
density = (100 – Range(“BG30”).Value) / 100
Making the final density test look like this in VBA:
density = (100 – Range(“BG30”).Value) / 100
rando = Rnd
If rando >= density then
‘Code goes here for growing a flower
End if

There is one more variable that must be considered and I call it height. Suppose you want to grow a plant and pepper it with flowers but you only want the flowers to grow on the top 30% of the stem. Or, maybe you have another set of stems and want flowers to grow on the top 90%, nearly to the bottom of the stems. All one has to do is calculate how tall the tallest stem is, once that number is obtained its an easy calculation to discover what x % of the plant stem is. Let’s look at that here before growing the first flowers.
From the perspective of the flower pot, the lower the row number; the taller the plant. A plant that peaks in row 23 is shorter than a plant that peaks in row 4.
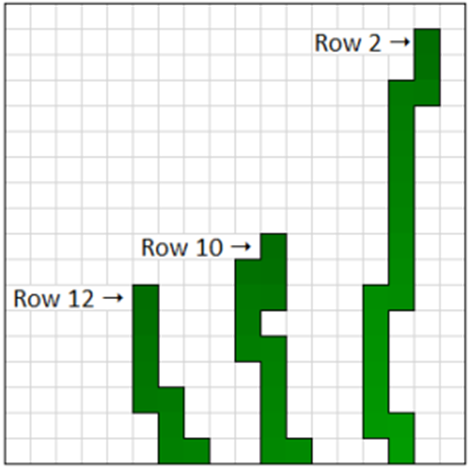
Introduce a new variable into the first macro we wrote in the previous blog, the macro called “grow.” Set that variable equal to 46, the row that corresponds to the top of the flower pot, where every plant will start. I called my height variable “tall” so add this line at the beginning of the macro:
tall = 46
Then place this into the main growing loop, near the bottom after a new ”start1” has been calculated and the plant has grown into that location:
If start1 < tall Then tall = start1
Recall that “start1” is the row variable for the latest stem segment. If that row variable is less than “tall” that signifies that the plant has grown up higher than previously recorded. If that is the case then simply set “tall” equal to the new high. After the plant has finished growing the variable “tall” will store it’s highest point and we will be using that in future calculations.
Now we can calculate the height variable that will give us the row where the flower program will exit its loop. Here is that equation:
Height = (46 – tall)* (Range(“BG33”).value)/100) + tall
Then of course:
Do until r > Height
Using an example for best clarification, let’s assume the user wants flowers to grow on 75% of the plant stem, leaving the bottom 25% flower-free. They will enter the number 75 in range CD18. Let’s also assume that the plant stem hit a maximum height at row 11, the variable “tall” will be equal to 11. We know that the bottom of the plant is row 46 and the top of the plant is row 11 making the total plant height 35 cells (46 – 11 = 35). 75% of 35 (35 * 0.75) is 26.25 (don’t worry about the decimal places, they will effectively be rounded down in a second). So of this plant’s stem, 26 cells are eligible to hold flowers but we can’t allow the loop to end at row 26 because the plant’s top-most part doesn’t start until row 11. Add the 11 back to that 26.25 to obtain the number 37.25. Now the flower macro will loop until it is greater than row 37, leaving the bottom 25% of the plant free of flowers (because I used the > symbol any non-integer between 37 and 38 will be effectively disregarded, all numbers will be rounded down to their nearest integer)

Everything is now set to begin growing the flowers, it is time to look at the flower designs. The first flower design I created is for medium size flowers so let’s look at the whole process. This is a very simple flower to make because it is only a square and squares lend themselves nicely to be treated as ranges in Excel.
Start at the beginning, for reasons that will become very clear, the row and column variables start at 2 and 2. This Is because the flowers are 3 x 3 cells and the midpoint is cells(r,c). If cells(1,1) were allowed to grow a flower then part of it would be outside the growing area and I don’t want to allow that. Similarly, for this flower shape, I won’t allow the column variable to go all the way to the right edge of the growing area. If I did then we again run the risk of a flower reaching beyond the growing area. For larger or smaller flowers these restrictions will be altered
Sub flower()
Height = (46 – tall) * (Range(“BG33”).value / 100) + tall
r = 2
c = 2
Set up the loop to go until the user specified end point:
Do Until r > Height
Obtain the density variables from the user input in cell BG30:
density = (100 – Range(“BG30”).Value) / 100
Then look for a stem segment:
If Cells(r, c).Interior.ColorIndex <> xlNone Then
If it finds a segment, run the density test:
rando = Rnd
If rando > density Then
If the test is passed it will create a flower at this cell, So it is time to obtain the flower’s color now. Call the color sub routine which was explained earlier:
Call colory
That subroutine will run and determine the color of the flower thats about to spawn. Now we need a range to input the flower into, medium flowers are 3 x 3 cells in size. First, obtain the address of the current cell (cell(r,c)) and use this as the flowers midpoint. Calculate the range of a 3 x 3 cell area by using the offset method. The area will be a square formed from the top left corner to the bottom right corner. The top left corner’s address will be called “addy1” and the bottom right corner’s address will be “addy2.”
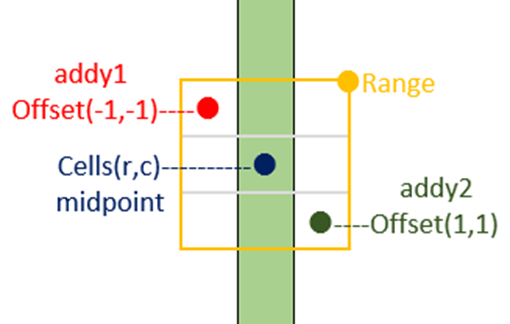
addy1 = Cells(r, c).Offset(-1, -1).Address
addy2 = Cells(r, c).Offset(1, 1).Address
midpoint = Cells(r, c).Address
With this range I want to eliminate all the borders first and here is why, the flower needs to reside in front of the stem and therefore any stem borders must be deleted, otherwise they may criss-cross over the flower and it will look hideous. So, with the flower’s range, use the following VBA syntax to remove any and all borders first, then add a line of code to place a new border around the perimeter of the flower, making everything look nice and clean and, of course, fill in the range with the color given by colory:
With Range(addy1, addy2)
.Borders.LineStyle = xlLineStyleNone
.Interior.Color = RGB(red, green, blue)
.BorderAround xlContinuous
End With
BorderAround xlContinuous is a really great shortcut for perimeter borders, otherwise you would need to add in a left border, then a right border, etc. until the range is surrounded. This saves us a few lines of code.
Finally, color the midpoint a nice looking brown color before closing all the flower’s if statements (recall that cells(r,c) is actually the middle of the flower):
Cells(r,c).Interior.Color = RGB(102, 102, 0)
End If
End If
After all that, the program must run on, increase the column variable and look for more stem segments from top to bottom:
c = c + 1
If c > 50 Then
r = r + 1
c = 2
End If
Loop
End Sub
That is everything needed to create a medium, square shaped flower. There are two other flowers sizes to be looked at and they each function in slightly different ways.

As you can see from the shape above, these aren’t regularly shaped entities and, unfortunately, there is no easy way to deal with irregularly shaped ranges in Excel, meaning any range not rectangular in shape. Fortunately, we have a few tricks up our sleeves. Let’s break down the flower’s shape. There are four pieces, the middle square, the four extremities, the perimeter border, and the center point.
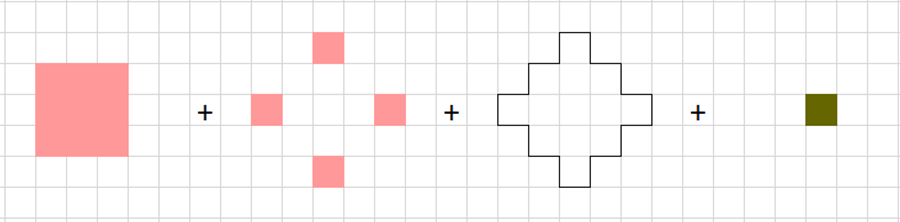
The main square body and the center point are exactly the same as a medium shaped flower and we already know how to do so let’s just reuse that exact code. The perimeter border will need adjusting but go ahead and reuse the exact same code for that as well and the adjustment comes later. Basically, let’s just recreate the medium sized flower then focus on the extremities. They encircle the flower’s main body and we already know their addresses: Offsets (0,2); (2,0); (0,-2); and (-2,0). One way of formatting those cells is selecting their ranges individually and applying the border and color formats each time, easy to do but requires lots of lines of VBA and is a bit slow. The other option to create a loop that will format the cells we want to in a circle around the center point. But how do we create a loop that moves around in a circle? We can use sine and cosine, which are trigonometric functions that are already built right into Excel and VBA. Time to dust off your old trigonometry books. Don’t worry though, this will be easy and much cleaner than individually formatting each cell.
A brief overview about the trigonometry used in this loop:
I could expand more about this topic but this isn’t the place for it, some explanation is require however. Basically, sine and cosine are the y and x coordinates (which we will translate into row and column variables) for a given angle around a circle with a radius of 1, a circle which is centered at x and y coordinates (0,0). This circle is called the unit circle. Sine oscillates back and forth between -1 and +1 as does cosine. If we want to format the cell above the flower’s center point we know that it is, from the unit circle’s perspective, 90 degrees above the midpoint, or at Pi/2 in radians. (Pi = 180° so Pi/2 = 90°)
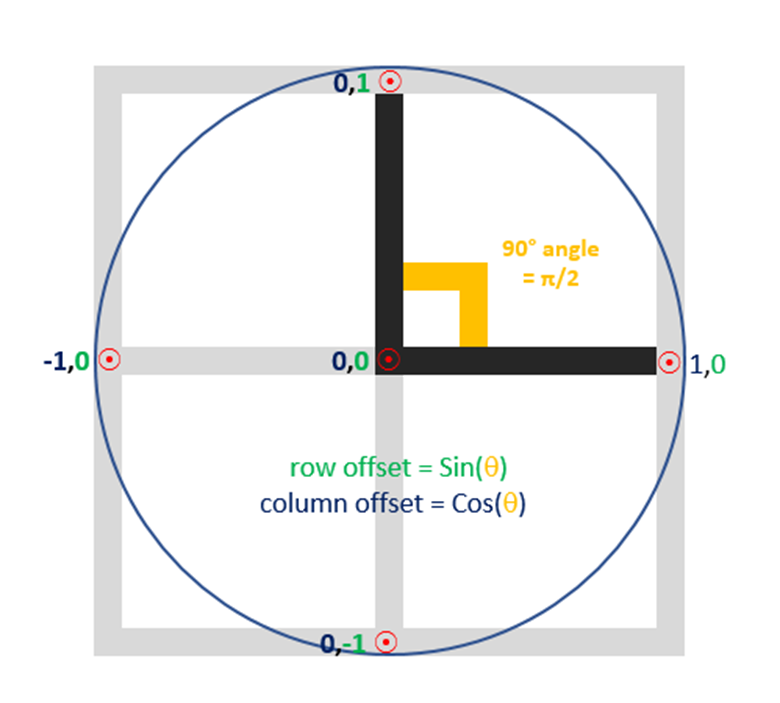
Sine of Pi/2 is equal to 1 and cosine is equal to 0 because this point is up on the y axis and neither left or right of the origin on the x axis.
Next, subtract 90 degrees, or Pi/2, from the angle and again format the cell at that coordinate. This time it lies directly in front of the origin cell so there is no deviation from the y axis, y = 0. It does however lie in front of the origin cell on the x axis, x is now = 1. Decrease the angle by 90 degrees again and you will see the coordinates for the cell directly below the midpoint are x = 0, y = -1. The sine and cosine values, our row and column offset values, will continually oscillate between -1 and +1. One final caveat, sine and cosine are producing 1’s and 0’s, but if we require our cells to be 2 cells away from the center point we require 2’s and 0’s. And of course the solution is to simply multiply those values by 2
y = Pi/2
r= sin(y) * 2
c = cos(y) * 2
This will work every time but if your cells seem to be formatted in an order you weren’t expecting remember that a y value of 1 corresponds to a row below the origin and a y value of -1 actually references the row above the origin in Excel (if your midpoint cell is in row 5 and y = -1 that references a cell in row 4). I will elaborate on trig in VBA in another post and link to it here when that is completed.
Time to look at the code for building large flowers, you will see that trigonometric loop within this subroutine.
For the large flower macro, first create the new variables required for this specific sub routine. For looping around a midpoint we will need the sine and cosine functions and to use those we will need the famous mathematical number Pi. Excel has Pi built in, luckily, so obtain it using the worksheet function method. Set another variable, mine is simply “x”, equal to Pi/2, this corresponds to a quarter turn around a circle and we will need that later to format the four cells, each a quarter turn, around the midpoint of the flower. “x” will be a constant so create one more variable “y” to use as the rotating angle, it’s starting value can just be equal to “x” for simplicity. The following code block will be identical to the initial code for medium sized flowers except this one starts at row 3 and column 3, again to ensure that all parts of the flower will be within the growing area.
Sub flowerlarge()
Pi = WorksheetFunction.Pi
x = Pi / 2
y = x
r = 3
c = 3
Height = (46 – tall) * ((Range(“BG33”).Value) / 100) + tall
Do Until r > Height
density = (100 – Range(“CD27”).Value) / 100
If Cells(r, c).Interior.ColorIndex <> xlNone Then
rando = Rnd
If rando > density Then
Call colory
addy1 = Cells(r, c).Offset(-1, -1).Address
addy2 = Cells(r, c).Offset(1, 1).Address
Range(addy1, addy2).Interior.Color = RGB(red, green, blue)
With Range(addy1, addy2)
.Borders.LineStyle = xlLineStyleNone
.Interior.Color = RGB(red, green, blue)
.BorderAround xlContinuous
End With
Cells(r, c).Interior.Color = RGB(102, 102, 0)
We have just created a medium sized flower, complete with perimeter border and center piece. Now to add the extremities. There will be four cells that need formatting which means we will subtract Pi/2 from “y” a total of three times. This means that we want to keep looping until y is less than -Pi.
At each rotation make sure to format each cell in the following ways: color in it using the pre-obtained color. Add a perimeter border around it then subtract off one border from the inner-most side of the cell, the side that is closest to the main body of the flower.
The best way to do that in this context is to take an arbitrary variable, call it “u” or whatever, and set it equal to the border you would like eliminated. Then simply call the function Cells(r, c).Offset(r2, c2).Borders(u).LineStyle = xlNone. If “u” was set to xlEdgeTop then the top border would have been eliminated. There should be a nice way to loop through this part using numbers to represent each cell edge, but in this case there isn’t. What we have to do, somewhat clumsily, is set “u” equal to the side we know needs deleting based on the subsequent value of “y.” Put all of that together to build the loop needed to place the finishing touches on the large flower.
Do Until y < -Pi
r2 = Round(Cos(y)) * 2
c2 = Round(Sin(y)) * 2
Cells(r, c).Offset(r2, c2).Interior.Color = RGB(red, green, blue)
Cells(r, c).Offset(r2, c2).BorderAround xlContinuous
If y = Pi / 2 Then u = xlEdgeLeft
If y = 0 Then u = xlEdgeTop
If y = -Pi / 2 Then u = xlEdgeRight
If y = -Pi Then u = xlEdgeBottom
Cells(r, c).Offset(r2, c2).Borders(u).LineStyle = xlNone
y = y – x
Loop
y = Pi / 2
After the loop has run its course exactly four times, all the outermost pieces of the flower should be looking good and solidly connected to the main body. Don’t forgot to reset “y” back to its initial value after the loop, to ensure that the next flowers get the same treatment. Finally, make sure to finish the loop by increasing the column variable, etc. etc.
End If
End If
c = c + 1
If c > 49 Then
r = r + 1
c = 3
End If
Loop
End Sub

Creating small flowers works very much the same way as the others with a few specific changes. Since a small flower is only size 1 x 1 cell I thought it might be better to allow these small ones to sit on either side of a stem segment, as well as directly on top of one. This means that the program could potentially grow a flower if the current cell has a stem, if the cell one column to the left has a stem, or if the cell one column to the right has a stem. This won’t change too much but I will run through the differences below. First, obtain the height and density variables and setup the loop as usual, if the program comes upon a stem segment then it gets interesting:
Sub flowersmall()
r = 1
c = 1
Height = (46 – tall) * ((Range(“BG33”).Value) / 100) + tall
Do Until r > Height
density = (100 – Range(“BG30”).Value) / 100
If Cells(r, c).Interior.ColorIndex <> xlNone Then
rando = Rnd
If rando > density Then
Call colory
Here is the first major change. Introduce two new variables, they will represent a range of three cells, a column offset of -1, to a column offset of +1. Anywhere in this range is fair game for a small flower to be born.
A flower can grow in any of those three cells above. There must, however, be two restrictions. If the program finds a stem in column 1 then we cannot allow it to grow a flower in column 0, it doesn’t exist. So if c = 1 then we limit the above three cell ranges to just cells(r,c) and it’s offset to the right, Offset(0,1). Similarly, if the program finds a stem in the rightmost column of the growing area, column 52, we must restrict the above three cell range to only two. Cells(r,c) and it’s immediate left-hand neighbor. If we are at neither border then allow the left and right neighboring cells to have an equal chance of being selected. The below code checks for these restrictions and then defines where a flower can grow:
If c = 1 Then
L = 0
Ri = 1
ElseIf c = 52 Then
L = -1
Ri = 0
Else
L = -1
Ri = 1
End If
randflower = Application.WorksheetFunction.RandBetween(L, Ri)
Now, the flower will grow at randomly selected offset of cells(r,c). Keep in mind, there is still a 33.3% chance of the column offset variable being a 0, meaning the flower will grow right on top of the stem segment. Once the address for the flower has been decided, follow the same steps as before, eliminate the borders, color in the cell, and place a perimeter border. Because this flower type is only a 1 x 1 cell there is no brown midpoint.
addy1 = Cells(r, c).Offset(0, randflower).Address
With Range(addy1)
.Interior.Color = RGB(red, green, blue)
.Borders.LineStyle = xlLineStyleNone
.BorderAround xlContinuous
End With
End If
End If
c = c + 1
If c > 52 Then
r = r + 1
c = 1
End If
Loop
End Sub

There are still two things left to do and they are very simple. First, there should be a way to clear the growing area make way for new plants, yes I am going to write a macro that kills the plant. However, I thought it would be cool to have the ability to save the plants as well, both because some of them can end up looking really beautiful and also to increase the replay value of this program. So, first the kill macro:
Sub kill()
tall = 46
With Range(“A1”, “AZ100”)
.Interior.Color = xlNone
.Borders.LineStyle = xlLineStyleNone
End With
End Sub
The first thing this macro does is reset the height variable so that it will be ready for the next plant. Then, simply select the growing area and eliminate all cell colors and borders.
Finally, the last macro of this project. Here is a line by line breakdown of how this macro works:
Sub savephoto()
copies the growing range
Range(“A1”, “AZ57”).Copy
counts the number of sheets in the workbook
county = Sheets.Count
creates a new sheet and calls it “Photo X” with X being the number of sheets counted
Sheets.Add(After:=Sheets(Sheets.Count)).Name = “Photo ” & county
Pastes the copied plant as an image onto the newly created sheet in the top left corner
With Sheets(“Photo ” & county)
.Range(“A1”).Select
ActiveSheet.Pictures.Paste
End With
Unselects the growing range and ends the subroutine
Application.CutCopyMode = False
End Sub
Don’t forget to include two buttons and assign the kill and photo macros to them.
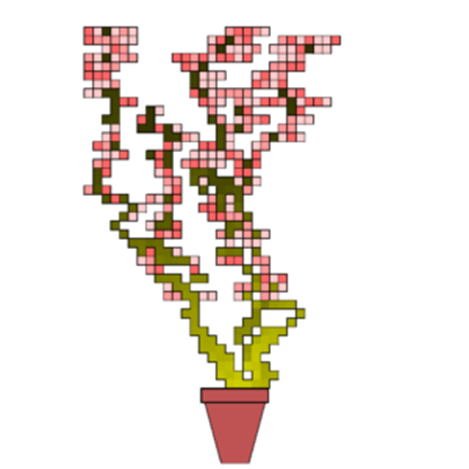
This brings us to the end of this project, for the moment anyway. Some of the above code could be made more efficient, combing the medium and large flower macros is one possibliity, but I decided to leave it this way as it is easier to understand. In addition to making it a little more efficient, there are many other things that can still be done, I would like to design new flowers, for instance, and program them into the project at a future date. And there is still a great deal of play left with colors. For example, in honor of Sakura season and all the cherry blossoms blooming across the world as I type this, I changed the stem to a gradient of brown and restricted the red colored flowers to only a couple lighter shades, thereby creating my own cherry blossoms like this one below:
(If you would also like to play with brown stems, change the color in the grow macro to this, initial values:
green = 204
red = 204
blue = 0
then, inside the loop:
green = green * 0.98
red = red * 0.98
blue = 0
)
I hope this has been entertaining and useful. Please feel free to post any of your own plants in the comments or on the Facebook page.
Download file below:
Grow a Plant VBA code
Dim tall As Integer
Dim red As Integer
Dim blue As Integer
Dim green As Integer
Sub grow()
green = 255
red = 0
blue = 0
loopers = 1
tall = 46
Do Until loopers > Range(“BG19”)
‘green = 204 ‘
green = 255
red = 204
‘blue = 0 ‘
blue = 204
Randomize
start1 = 46
start2 = 27
y = 1
r = 0
Z = 0
c = 0
Cells(start1, start2).Interior.Color = RGB(red, green, blue)
Do Until y = 75
r = Application.WorksheetFunction.RandBetween(-1, 0)
c = Application.WorksheetFunction.RandBetween(-1, 1)
If Range(“BG17”) = “Tall” Then
If r = -1 Then c = 0
End If
If Range(“BG17”) = “Short” Then
If c = 1 Or c = -1 Then r = 0
End If
Cells(start1, start2).Offset(r, c).Interior.Color = RGB(red, green, blue)
‘green = green * 0.98 ‘
green = green – 2
‘red = red * 0.98 ‘
red = red * 0.7
If red < 0 Then red = 0
‘blue = 0 ‘
‘blue = blue * 0.99 ‘
blue = blue * 0.7
If blue < 0 Then blue = 0
‘If r = -1 Then
‘End If
start1 = Cells(start1, start2).Offset(r, c).Row
If start1 <= 1 Then start1 = start1 + 1
start2 = Cells(start1, start2).Offset(r, c).Column
If start2 <= 1 Then start2 = start2 + 1 If start2 >= 52 Then start2 = start2 – 1
y = y + 1
If start1 < tall Then tall = start1
Range(“CH16”).Value = tall
Loop
loopers = loopers + 1
Loop
If Range(“BG21”).Value = “Yes” Then
Call findbordr
End If
End Sub
Sub findbordr()
r = 1
c = 1
Do Until r > 50
If Cells(r, c).Interior.ColorIndex <> xlNone Then
If Cells(r, c).Offset(0, 1).Interior.ColorIndex = xlNone Then
Cells(r, c).Borders(xlEdgeRight).LineStyle = xlContinuous
End If

If c = 1 Then
Cells(r, c).Borders(xlEdgeLeft).LineStyle = continuous
c = c + 1
End If

If Cells(r, c).Offset(0, -1).Interior.ColorIndex = xlNone Then
    Cells(r, c).Borders(xlEdgeLeft).LineStyle = xlContinuous
    c = c + 1

Else:
    c = c + 1
    If c > 52 Then
        c = 1
        r = r + 1
    End If
End If
Else:
c = c + 1
If c > 52 Then
r = r + 1
c = 1
End If
End If
Loop
Call findbordt
End Sub
Sub findbordt()
r = 2
c = 1
Do Until r > 50
If Cells(r, c).Interior.ColorIndex <> xlNone Then
If Cells(r, c).Offset(1, 0).Interior.ColorIndex = xlNone Then
    Cells(r, c).Borders(xlEdgeBottom).LineStyle = xlContinuous
End If

If Cells(r, c).Offset(-1, 0).Interior.ColorIndex = xlNone Then
    Cells(r, c).Borders(xlEdgeTop).LineStyle = xlContinuous
    c = c + 1
Else:
    c = c + 1
    If c > 52 Then
        c = 1
        r = r + 1
    End If
End If
Else:
c = c + 1
If c > 52 Then
r = r + 1
c = 1
End If
End If
Loop
End Sub
Sub flower()
b1 = xlEdgeLeft
b2 = xlEdgeTop
b3 = xlEdgeRight
b4 = xlEdgeBottom
Pi = 4 * Atn(1)
x = Pi / 2
y = x
u = b1
Z = 1
If Range(“CD29”).Value = “Large” Then
Call flowerlarge
ElseIf Range(“CD29”).Value = “Small” Then
‘If Range(“CD29”).Value = “Small” Then
Call flowersmall
Else
Height = (46 – tall) * ((Range(“BG33”).Value) / 100) + tall
‘Height = Range(“CH18”).Value ‘ + Range(“CH18”).Value
r = 2
c = 2
Do Until r > Height
density = (100 – Range(“BG30”).Value) / 100
If Cells(r, c).Interior.ColorIndex <> xlNone Then
rando = Rnd
If rando > density Then
Call colory
addy1 = Cells(r, c).Offset(-1, -1).Address
addy2 = Cells(r, c).Offset(1, 1).Address
midpoint = Cells(r, c).Address
Range(addy1, addy2).Interior.Color = RGB(red, green, blue)
With Range(addy1, addy2)
.Borders.LineStyle = xlLineStyleNone
.Interior.Color = RGB(red, green, blue)
.BorderAround xlContinuous
End With
If Range(“CD29”).Value = “Large” Then
Do Until Z > 4
r2 = Round(Cos(y)) * 2
c2 = Round(Sin(y)) * 2
Cells(r, c).Offset(r2, c2).Interior.Color = RGB(red, green, blue)
Cells(r, c).Offset(r2, c2).BorderAround xlContinuous
If Z = 1 Then u = b1
If Z = 2 Then u = b2
If Z = 3 Then u = b3
If Z = 4 Then u = b4
Cells(r, c).Offset(r2, c2).Borders(u).LineStyle = xlNone
y = y – x
Z = Z + 1
Loop
Z = 1
End If
Range(midpoint).Interior.Color = RGB(102, 102, 0)
End If
End If
c = c + 1
If c > 50 Then
r = r + 1
c = 2
End If
Loop
End If
End Sub
Sub kill()
tall = 46
With Range("A1", "AZ100")
    .Interior.Color = xlNone
    .Borders.LineStyle = xlLineStyleNone
End With
End Sub
Sub flowerlarge()
Pi = WorksheetFunction.Pi
x = Pi / 2
y = x
r = 3
c = 3
‘Height = Range(“CH18”).Value ‘ + Range(“CH18”).Value
Height = (46 – tall) * ((Range(“BG33”).Value) / 100) + tall
Do Until r > Height
density = (100 – Range(“CD27”).Value) / 100
If Cells(r, c).Interior.ColorIndex <> xlNone Then
rando = Rnd
If rando > density Then
Call colory
addy1 = Cells(r, c).Offset(-1, -1).Address
addy2 = Cells(r, c).Offset(1, 1).Address
Range(addy1, addy2).Interior.Color = RGB(red, green, blue)
With Range(addy1, addy2)
.Borders.LineStyle = xlLineStyleNone
.Interior.Color = RGB(red, green, blue)
.BorderAround xlContinuous
End With
Cells(r, c).Interior.Color = RGB(102, 102, 0)
Do Until y < -Pi
r2 = Round(Cos(y)) * 2
c2 = Round(Sin(y)) * 2
Cells(r, c).Offset(r2, c2).Interior.Color = RGB(red, green, blue)
Cells(r, c).Offset(r2, c2).BorderAround xlContinuous
If y = Pi / 2 Then u = xlEdgeLeft
If y = 0 Then u = xlEdgeTop
If y = -Pi / 2 Then u = xlEdgeRight
If y = -Pi Then u = xlEdgeBottom
Cells(r, c).Offset(r2, c2).Borders(u).LineStyle = xlNone
y = y – x
Loop
y = Pi / 2
End If
End If
c = c + 1
If c > 49 Then
r = r + 1
c = 3
End If
Loop
End Sub
Sub flowersmall()
r = 1
c = 1
‘Height = Range(“CH18”).Value ‘ + Range(“CH18”).Value
Height = (46 – tall) * ((Range(“BG33”).Value) / 100) + tall
Do Until r > Height
density = (100 – Range(“CD27”).Value) / 100
If Cells(r, c).Interior.ColorIndex <> xlNone Then
rando = Rnd
If rando > density Then
Call colory
If c = 1 Then
L = 0
Ri = 1
ElseIf c = 52 Then
L = -1
Ri = 0
Else
L = -1
Ri = 1
End If
randflower = Application.WorksheetFunction.RandBetween(L, Ri)
addy1 = Cells(r, c).Offset(0, randflower).Address
‘Range(addy1).Interior.Color = RGB(red, green, blue)
With Range(addy1)
.Interior.Color = RGB(red, green, blue)
.Borders.LineStyle = xlLineStyleNone
.BorderAround xlContinuous
End With
End If
End If
c = c + 1
If c > 52 Then
r = r + 1
c = 1
End If
Loop
End Sub
Sub savephoto()
Range(“A1”, “AZ57”).Copy
county = Sheets.Count
Sheets.Add(After:=Sheets(Sheets.Count)).Name = “Photo ” & county
With Sheets(“Photo ” & county)
.Range(“A1”).Select
ActiveSheet.Pictures.Paste
End With
Application.CutCopyMode = False
End Sub
Sub colory()
Randomize
randocolor = Application.WorksheetFunction.RandBetween(0, 4)
red = 51 * randocolor
green = 51 * randocolor
blue = 51 * randocolor
If Range(“CD23”).Value = “Blue” Then blue = 255
If Range(“CD23”).Value = “Red” Then red = 255
If Range(“CD23”).Value = “Green” Then green = 255
If Range(“CD23”).Value = “Purple” Then red = 255: blue = 255 ‘And blue = 255
If Range(“CD23”).Value = “Yellow” Then red = 255: green = 255 ‘And blue = 255
End Sub
Sub colotest()
‘tt = Range(“x31”).Color
MsgBox tall
End Sub